

User Guide
Go deep. Here's the whole story.
- Installation
- Creating the Uploader
- Button Options
- Upload Events
- Drag and Drop
- Server Side Handling
- Where to Go From Here
Installation
First things first, you'll need to download the GWT Uploader release jar file, and add it to your project's class path. E.g.:
In the case that GWT Uploader determines that the SWFUpload library will be needed to handle the upload, it will automatically include the necessary JS and SWF files in the page - so no additional installation steps are required.
Finally, before you begin using the API within your project you'll need to update your GWT module's XML configuration file to import the GWT Uploader module. E.g.:
Creating the Uploader
One of the key features of GWT Uploader is that it will attempt to handle the upload process using an HTML5 approach (taking advantage of the capabilities provided by the File and XMLHttpRequest Level 2 APIs) if the browser can support it. However, for browsers that can not support those capabilities, it transparently fails over to use the SWFUpload library instead. In order to work around security limitations in Flash 10, the SWFUpload library has to manage the button for you that the user will click on in order to select the files they wish to upload. Therefore, the GWT Uploader technology can be added to your application by creating an "org.moxieapps.gwt.uploader.Uploader" object, configuring it as you see put, and then adding it to any GWT layout container, just like any other GWT widget works. E.g., here's an example of setting up a chart as the root widget of your GWT panel:
/* ... configure the uploader here ... */
RootPanel.get().add(uploader);
Or, add an uploader to any other GWT layout container, such as a HorizontalPanel:
/* ... configure the uploader here ... */
HorizontalPanel panel = new HorizontalPanel();
panel.add(uploader);
If you're using a GWT widget library, you can also add an uploader directly to any of their layout containers. E.g., in SmartGWT, here's how you would add an uploader as the first component in a vertical layout:
/* ... configure the uploader here ... */
VLayout layout = new VLayout();
layout.addMember(uploader);
Button Options
To support compatibility with security limitations imposed by Flash (which will only be used if the browser doesn't support the necessary APIs, otherwise a pure DHTML/Javascript approach will be used) the GWT Uploader library has to manage control of the display of the text or button that the user will click on when they're ready to select a file to upload. There are two different ways that you can manage the way this is rendered. You can either just use plain text (stylized with basic CSS as needed):
.setButtonText("<span class=\"buttonText\">Click to Upload</span>")
.setButtonTextStyle(".buttonText {font-size: 14px; color: #BB4B44}")
.setButtonWidth(150)
.setButtonHeight(22);
Note that even if the button is rendered as text, you still need to specify the width/height for the case that the SWFUpload/Flash component is used (since it controls the size of the SWF file gets embedded in the page.) In the case that the pure DHTML approach is used, the size you specify will control the size of the 'div' that the text is rendered within.
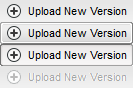
After the button has been rendered, you can then change the text of the button dynamically just via subsequent calls to the ".setButtonText()" method. E.g. while the upload is in progress you could change the text to read "Uploading..." or show the percentage complete. Alternatively, an image can be used to control the look and feel of the button, in which case the size of that you want the image rendered at needs to also be specified and a CSS sprite technique is used to find the correct piece of the image to display:
.setButtonImageURL("/resources/upload_new_version_button.png")
.setButtonWidth(133)
.setButtonHeight(22);
In the above example this example image was used, which shows how the image is broken down into four sprites designating the 1.) active/normal state of the button, 2.) the hover state, 3.) the mouse down state, and 4.) the inactive state.
Note that, although the GWT Uploader API doesn't technically require it (since it also supports a drag/drop upload mechanism) it is still recommended that you use one of the above techniques to render an upload link or button somewhere in your application, since not all browsers support drag-and-drop file uploads.
Upload Events
After the upload button or text is setup, most of the interesting things that you can do are provided by GWT Uploader's event API. E.g. the following code would cause the upload process to be kicked off immediately after the user selected a file to upload (instead of the user having to explicitly click a "start upload" button):
public boolean onFileDialogComplete(FileDialogCompleteEvent dialogCompleteEvent) {
if (dialogCompleteEvent.getTotalFilesInQueue() > 0) {
uploader.startUpload();
}
return true;
}
});
Or the following would update a label to show the percentage complete of a file being uploaded:
public boolean onUploadProgress(UploadProgressEvent uploadProgressEvent) {
label.setText((((float)uploadProgressEvent.getBytesComplete() / uploadProgressEvent.getBytesTotal()) * 100) + "% Complete"
);
return true;
}
});
Many types of events are available for you to respond to including knowing when a file has been added to the upload queue, the progress of an individual files upload, when a file upload has completed, and whenever a user or system error has occurred. Consult the types within the "org.moxieapps.gwt.uploader.client.events" package in the API docs for a full list, and the code examples also demonstrate all of the event types available.
Drag and Drop
Now that the newer file API is supported in most modern browsers the ability to allow the user to drag and drop files from their file system onto a target area in the browser and then automatically begin the upload is much more easily achievable. To support this type of upload approach the GWT Uploader package provides a couple of helpful features. One is the static "Uploader.getDroppedFiles()" method that can be coupled with the "addFilesToQueue()" instance method to conveniently get dropped files into the upload queue on a drop event. E.g.:
dropFilesLabel.addDropHandler(new DropHandler() {
public void onDrop(DropEvent event) {
uploader.addFilesToQueue(Uploader.getDroppedFiles(event.getNativeEvent()));
event.preventDefault();
}
});
Another convenient method provided by the GWT Uploader package is the static "Uploader.isAjaxUploadWithProgressEventsSupported()" method which can be used to determine if the current browser can support drag and drop upload events or not. E.g. the following is a more complete example of how a drag and drop file upload could be setup, only adding the drop area to the application if the browser supports it, and providing the user with a visual indicator of where they can drop the files:
if (Uploader.isAjaxUploadWithProgressEventsSupported()) {
final Label dropFilesLabel = new Label("Drop Files Here");
dropFilesLabel.setStyleName("dropFilesLabel");
dropFilesLabel.addDragOverHandler(new DragOverHandler() {
public void onDragOver(DragOverEvent event) {
if (!uploader.getButtonDisabled()) {
dropFilesLabel.addStyleName("dropFilesLabelHover");
}
}
});
dropFilesLabel.addDragLeaveHandler(new DragLeaveHandler() {
public void onDragLeave(DragLeaveEvent event) {
dropFilesLabel.removeStyleName("dropFilesLabelHover");
}
});
dropFilesLabel.addDropHandler(new DropHandler() {
public void onDrop(DropEvent event) {
dropFilesLabel.removeStyleName("dropFilesLabelHover");
uploader.addFilesToQueue(Uploader.getDroppedFiles(event.getNativeEvent()));
event.preventDefault();
}
});
verticalPanel.add(dropFilesLabel);
}
Server Side Handling
The only real option that the GWT Uploader requires is the "upload URL", which tells the uploader which URL in your infrastructure the files should be uploaded to. E.g.
.setUploadURL("/FileUploadServlet");
If the server responds with any data (JSON, XML, etc.) the GWT Uploader API provides access to the full response that the server generated on the UploadSuccessEvent instance passed to whatever UploadSuccessHandler you have registered. E.g.
public boolean onUploadSuccess(UploadSuccessEvent uploadSuccessEvent) {
Window.alert("Response from server was: " + uploadSuccessEvent.getServerData());
return true;
}
});
Independent of whether or note the browser supports the newer file API mechanisms or not, the GWT Uploader consistently uploads the file to the URL you provided so that it appears like a traditional file upload process on the server. Therefore, you can extract the raw details of the uploaded file using a traditional multi-part file upload processing mechanism. E.g. here's a fairly complete example of how to do this in Java using the Apache Commons FileUpload library:
import org.apache.commons.fileupload.servlet.ServletFileUpload;
import org.apache.commons.fileupload.disk.DiskFileItemFactory;
import javax.servlet.ServletException;
import javax.servlet.http.HttpServlet;
import javax.servlet.http.HttpServletRequest;
import javax.servlet.http.HttpServletResponse;
import java.io.IOException;
import java.util.List;
import java.util.logging.Level;
import java.util.logging.Logger;
public class FileUploadServlet extends HttpServlet {
private long FILE_SIZE_LIMIT = 20 * 1024 * 1024; // 20 MiB
private final Logger logger = Logger.getLogger("UploadServlet");
protected void doPost(HttpServletRequest req, HttpServletResponse resp)
throws ServletException, IOException {
try {
DiskFileItemFactory fileItemFactory = new DiskFileItemFactory();
ServletFileUpload fileUpload = new ServletFileUpload(fileItemFactory);
fileUpload.setSizeMax(FILE_SIZE_LIMIT);
List<FileItem> items = fileUpload.parseRequest(req);
for (FileItem item : items) {
if (item.isFormField()) {
logger.log(Level.INFO, "Received form field:");
logger.log(Level.INFO, "Name: " + item.getFieldName());
logger.log(Level.INFO, "Value: " + item.getString());
} else {
logger.log(Level.INFO, "Received file:");
logger.log(Level.INFO, "Name: " + item.getName());
logger.log(Level.INFO, "Size: " + item.getSize());
}
if (!item.isFormField()) {
if (item.getSize() > FILE_SIZE_LIMIT) {
resp.sendError(HttpServletResponse.SC_REQUEST_ENTITY_TOO_LARGE,
"File size exceeds limit");
return;
}
// Typically here you would process the file in some way:
// InputStream in = item.getInputStream();
// ...
if (!item.isInMemory())
item.delete();
}
}
} catch (Exception e) {
logger.log(Level.SEVERE, "Throwing servlet exception for unhandled exception", e);
throw new ServletException(e);
}
}
}
Where to Go From Here
The best place to go next is to checkout the various code demonstrations on the examples page. We also hope you'll find the API documentation to be useful, as quite a bit of effort has gone into ensuring the JavaDoc is thorough and useful. If you're still stuck though, the best place to go is to run a search or post a question on the forums.